SOFTWARE LICENSE AGREEMENT FOR AVERY® DESIGN & PRINT
THIS SOFTWARE LICENSE AGREEMENT ("Agreement") governs the user's ("Customer") use of Avery Products Corporation's
("Avery") Avery Design & Print software product, including any associated media and electronic documentation
("Software"). By installing, clicking on, and/or using this Software, Customer agrees to be bound by the terms
of this Agreement. If Customer does not agree to the terms of this Agreement, Customer is not to use the
Software. This Agreement does not grant Customer any other rights but for the ones expressly contained
herein.
- LICENSE: This Agreement grants Customer a revocable, gratis, nonexclusive license to use the Software in
its entirety to print on Avery branded products only, as specified herein. Customer may not modify or use
any part of the Software to print on or to non-Avery branded products. If Customer uses the Software or any
modified version of the Software with products that are not Avery-branded, such use constitutes copyright
infringement, and all rights granted immediately and automatically revert in full to Avery. This Agreement
shall be retained by Customer. Customer may not sell, resell, rent, assign, license, or lease the Software
or any of its components for consideration. Customer may deploy the Software to its internal web site (i.e.,
an Intranet) for internal (i.e., employee or home) use only but may not deploy the Software to any external
Internet web site. Customer may transfer Customer's rights under this Agreement on a permanent basis only if
(i) Customer transfers this Agreement, the entire Software, and all accompanying printed materials, if any,
(ii) Customer retains no copies of the Software or any portion thereof, including any clipart, documentation
or other components, and (iii) the recipient agrees to the terms of this Agreement. Customer may not reverse
engineer, decompile, modify, or disassemble the Software, in whole or in part. The Software's component
parts may not be separated from the Software. Customer may copy and install the Software only on its, its
employees', or its household members' personal computers, provided that all such internal copies reproduce
the entire Software, including all components and this Agreement.
- OWNERSHIP: The Software is licensed, not sold. The Software and its components are owned either by Avery
or its subsidiaries or third-party suppliers, who retain all right, title, and interest in the Software or
their respective components, and all copies thereof, and are therefore protected by United States
intellectual property laws and international treaty provisions. Customer shall not remove, modify, or alter
any patent, copyright, or trademark notice from any part of the Software. All rights not specifically
granted under this Agreement are reserved by Avery.
- NO WARRANTIES: TO THE MAXIMUM EXTENT PERMITTED BY APPLICABLE LAW, AVERY DISCLAIMS ALL WARRANTIES, EITHER
EXPRESS OR IMPLIED, INCLUDING BUT NOT LIMITED TO IMPLIED WARRANTIES OF MERCHANTABILITY, FITNESS FOR A
PARTICULAR PURPOSE AND NONINFRINGEMENT, WITH RESPECT TO THE SOFTWARE. AVERY DOES NOT WARRANT THAT THE
FUNCTIONS CONTAINED IN THE SOFTWARE WILL MEET CUSTOMER'S REQUIREMENTS, OR THAT THE OPERATION OF THE SOFTWARE
WILL BE CORRECTED. FURTHERMORE, AVERY DOES NOT WARRANT OR MAKE ANY REPRESENTATIONS REGARDING THE USE OR THE
RESULTS OF THE USE OF THE SOFTWARE IN TERMS OF ITS CORRECTNESS, ACCURACY, RELIABILITY, OR OTHERWISE. NO ORAL
OR WRITTEN INFORMATION OR ADVICE GIVEN BY AVERY OR AN AVERY AUTHORIZED REPRESENTATIVE SHALL CREATE A
WARRANTY OR IN ANY WAY INCREASE THE SCOPE OF THIS WARRANTY. SOME JURISDICTIONS DO NOT ALLOW THE EXCLUSION OF
IMPLIED WARRANTIES, SO THE ABOVE EXCLUSION MAY NOT APPLY TO CUSTOMER.
- LIMITS OF LIABILITY: TO THE MAXIMUM EXTENT PERMITTED BY APPLICABLE LAW, IN NO EVENT SHALL AVERY, ITS
SUPPLIERS, OR ITS DISTRIBUTORS BE LIABLE FOR ANY DAMAGES WHATSOEVER, INCLUDING, WITHOUT LIMITATION, SPECIAL,
INDIRECT, OR CONSEQUENTIAL DAMAGES OR DAMAGES FOR LOSS OF BUSINESS, LOSS OF PROFITS, BUSINESS INTERRUPTION,
LOSS OF BUSINESS INFORMATION, OR OTHER ECONOMIC LOSS ARISING OUT OF THE USE OF OR INABILITY TO USE THE
SOFTWARE, EVEN IF AVERY HAS BEEN ADVISED OF THE POSSIBILITY OF SUCH DAMAGES. IN ANY CASE, AVERY'S ENTIRE
LIABILITY UNDER ANY PROVISION OF THIS AGREEMENT SHALL BE LIMITED TO THE AMOUNT ACTUALLY PAID BY CUSTOMER
ALLOCABLE TO THE SOFTWARE. BECAUSE SOME STATES/JURISDICTIONS DO NOT ALLOW THE EXCLUSION OR LIMITATION OF
LIABILITY FOR CONSEQUENTIAL OR INCIDENTAL DAMAGES, THE ABOVE LIMITATION MAY NOT APPLY TO CUSTOMER.
- HIGH RISK ACTIVITIES: The Software is not fault-tolerant and is not designed, manufactured, or intended
for use or resale as on-line control equipment in hazardous environments requiring fail safe performance,
such as in the operation of nuclear facilities, aircraft navigation or communication systems, air traffic
control, direct life-support machines, or weapons systems, in which the failure of the Software could lead
directly to death, personal injury, or severe physical or environmental damage ("High Risk Activities").
Avery and its suppliers specifically disclaim any express or implied warranty of fitness for High Risk
Activities.
- APPLICABLE LAW: The laws of the State of California shall govern the interpretation of this Agreement and
any dispute relating to it. Customer agrees to the sole jurisdiction and venue of the courts located in the
County of Los Angeles, State of California. If this Software was acquired outside the United States, then
local law may apply. If Customer acquired this Software in Canada, Customer agrees to the following:
The parties to this Agreement have expressly required that the Agreement be drawn up in the English
language./Les parties aux presentes ont expressement exige que la presente conventiosoient redigees en
langue anglaise.
- U.S. GOVERNMENT RESTRICTED RIGHTS: The Software is provided with Restricted Rights. Use, duplication, or
disclosure by the United States Government is subject to restrictions as set forth in subparagraph (c) (1)
and (2) of the Commercial Computer Software-Restricted Rights at 48 CFR 52.227-19, as applicable.
Manufacturer is Avery Products Corporation, 50 Pointe Drive, Brea, California 92821.
- EXPORT RESTRICTIONS: Customer may not export or re-export the Software or any underlying information or
technology except in full compliance with all United States and other applicable laws and regulations.
- TERMINATION: Without limiting any of Avery's other rights, Avery may terminate this Agreement if Customer
fails to comply with the terms and conditions hereof. In such event, Customer must destroy and/or remove any
and all copies of the Software from Customer's computer(s) or network.
- MISCELLANEOUS: This is the entire Agreement between Avery and Customer relating to the Software and
supersedes any purchase order, communication, advertising, or representation concerning the Software. No
change or modification of this Agreement will be valid unless it is in writing and signed by an officer of
Avery.
- SEVERABILITY: In the event that any one or more of the provisions contained in this Agreement shall for
any reason be held by a court of competent jurisdiction to be unenforceable in any respect, such holding
shall not affect any other provisions of this Agreement, and the Agreement shall then be construed as if
such unenforceable provisions are not a part hereof.
To watch how-to videos and get more information, visit avery.com/help.
You are only licensed to use this software with genuine Avery products.
See License Agreement for details.
Choose Template – Step 1
-
Type the product or template number or search by description

- Switch between Print Yourself and Custom Printing at the top left
- Click the template you want to use
Choose or Upload Design – Step 2
- Click a blank or pre-designed template to customize
-
To use an image of one label or card, select Upload a Complete Design near the top

- Drag and drop or click Select File and browse for your image file
Tip: Use the menu on the left to browse categories
The Customize screen will show you one label in the middle of the screen for editing.
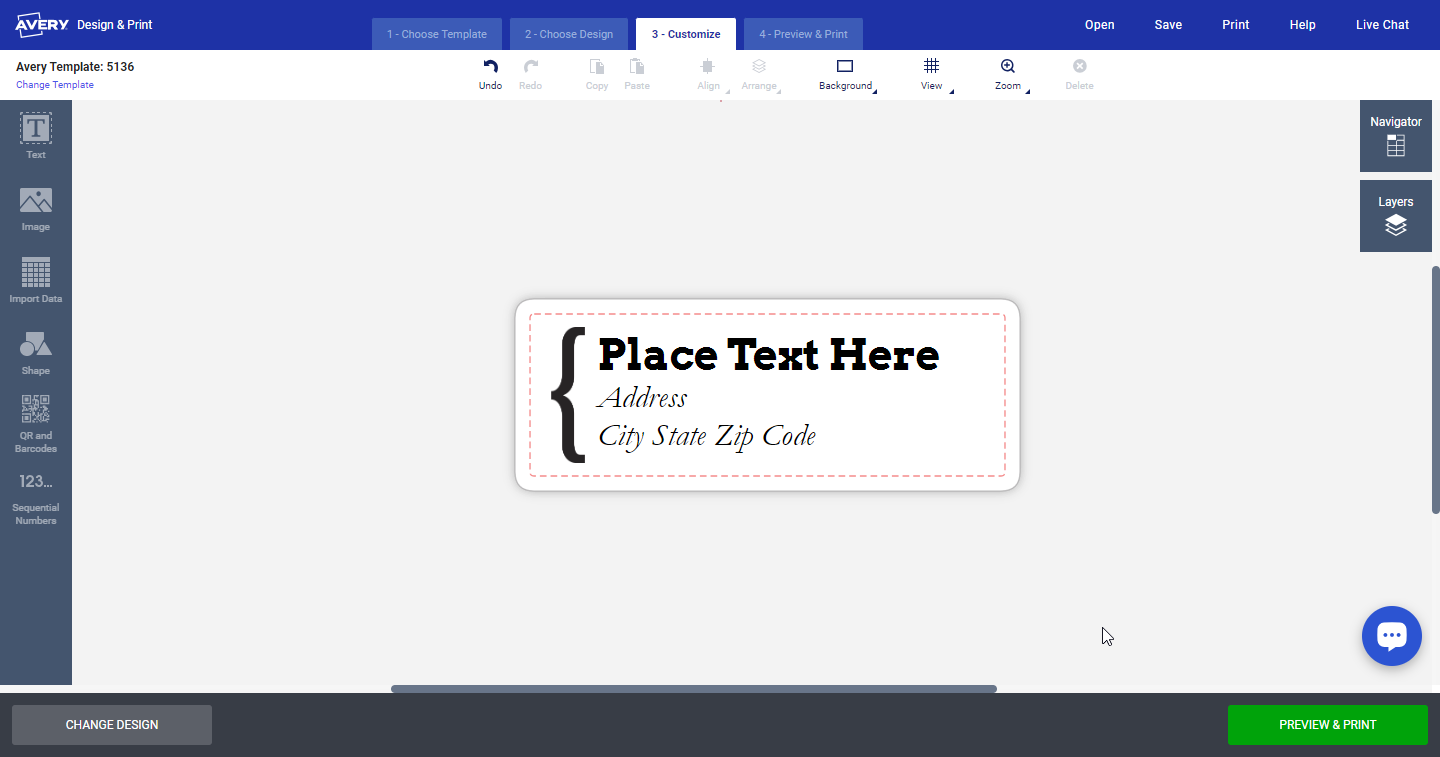

We have some different editing options on the ribbon at the top:
- Options to Open, Save, or Print your project are in the upper right
- You can use Undo and Redo if you make a mistake
- Select text or images and use Copy and Paste to duplicate part of your design
- Align allows you center text or images on your template
- You can use Arrange to send images or text to the front or back of your design
- Background lets you apply a single background colour to your entire template
- View has options for flipping your template, turning off gridlines, spellcheck, and more
- If you need a closer look at your design, use the Zoom slider
- If you want to delete any images or text, use the Delete button
If you want to add different design elements, such as images, text, or importing data from a spreadsheet, use the toolbar on the left side of the screen.

-
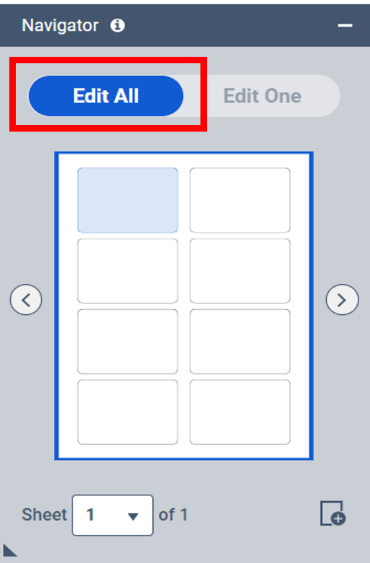
In the Navigator near the top right of Step 3,
start on Edit All to create the design for your entire sheet
-
Stay on Edit All for all labels or cards to be the same
-
After your design is done, click Edit One to change individual labels or cards
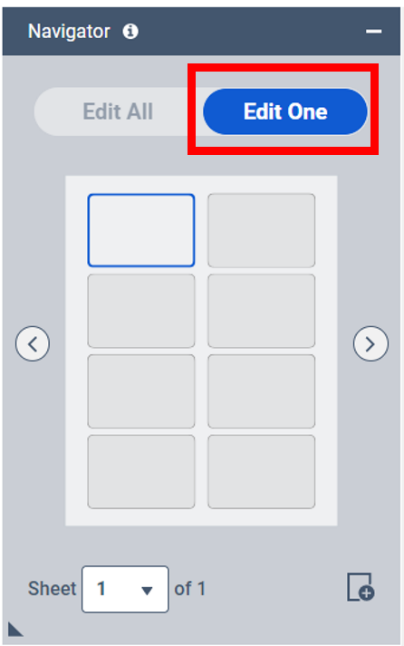
- In the Navigator or above your project, click the next item to edit
Tip: We don’t recommend making multiple switches from Edit One to Edit All
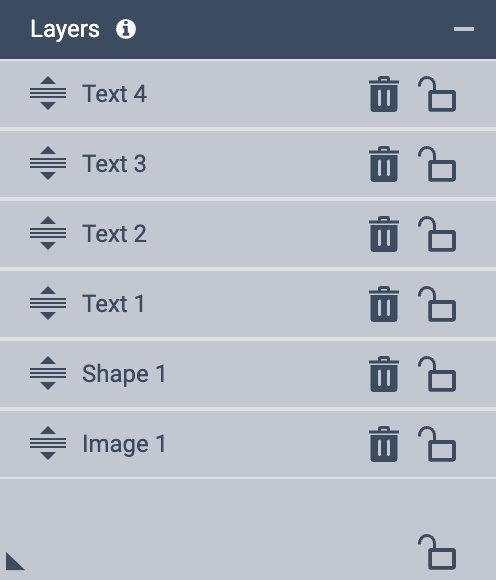
Layers allow you to organize text and images in your design.
- Click and drag an object to re-arrange it
- Moving a text box or image to the top of the layers will make it appear in the front of the objects that are lower in the panel
- Click the lock icon to lock an object in the design. This prevents the layer from moving or being edited
Tip: If you have added multiple text boxes, images, or shapes, you can use the Layers to select your item.
Add or delete a text box
-
Select Text on the left side and click Add Text Box
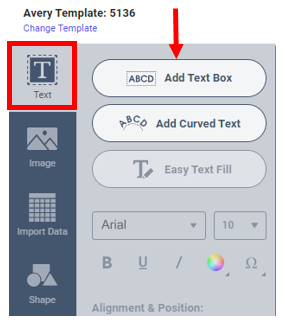
- Delete the sample text and type your text in the center of the screen
-
To delete a text box, click the edge, then click Delete on your keyboard or the delete icon near the top

Tip: Stay on Edit All until you get all the text formatting done, then switch to Edit One to change individual labels or cards
Change font size, style and colour
-
Select the edge of the text box or click and drag your mouse to highlight your text
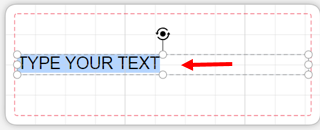
-
Choose a different font style or size or colour or alignment from the menu on the left
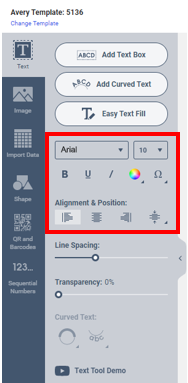
-
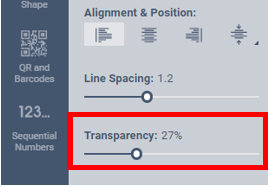
The Line Spacing slider changes the space between lines of text
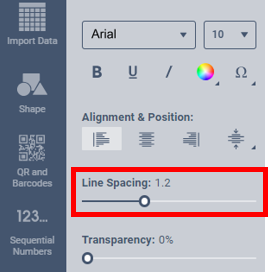
-
The Transparency slider adds opacity
Move and rotate a text box
-
Click into the text box, then hover your cursor over the dotted lines
bordering the text box until your cursor appears as a four-headed arrow
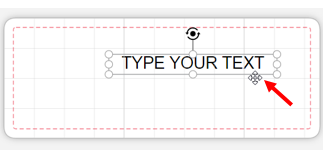
- Click and hold, then drag to move the text box (or click the edge and use the arrow keys on your keyboard)
-
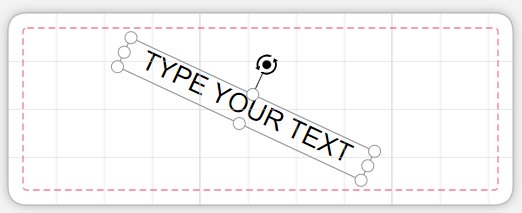
Rotate a text box by clicking the blue circular button at its top and dragging left or right
Tip: Hold down the Shift key while using the arrow keys for smaller movements
Resize a text box
- Click into the text box, then hover your cursor over the white circles at the top or sides
-
Your cursor will appear as a two-headed arrow
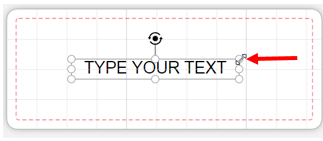
- Click and hold, then drag to resize the text box
Add circular text
-
Click Text and Add Curved Text on the left side
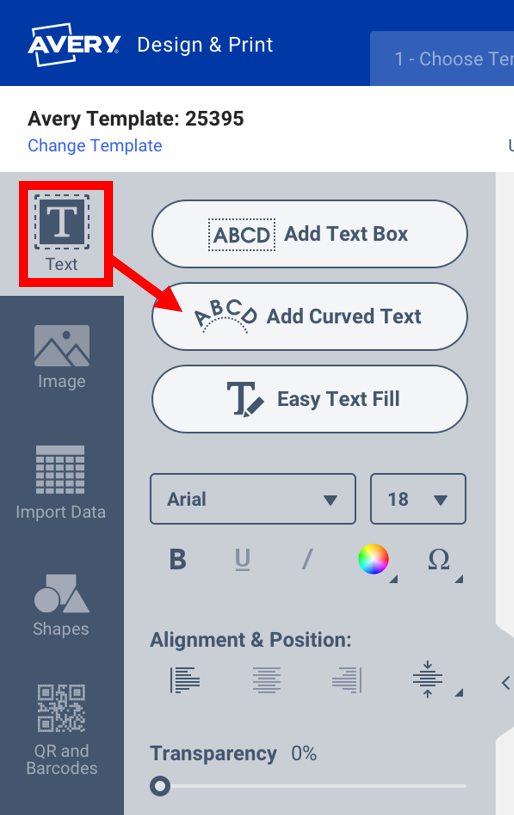
- Replace the placeholder text with your text and change the font style, size and colour
- Resize the text box to make the curve wider or more narrow
-
Use the Curved Text drop-downs to change the location or orientation of the text
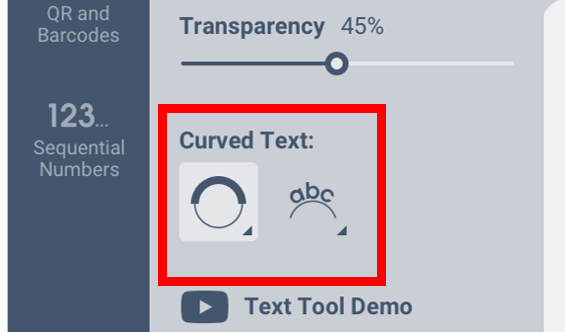
Tip: Use Arrange near the top to move the Curved Text box behind other objects
Add or delete an image
-
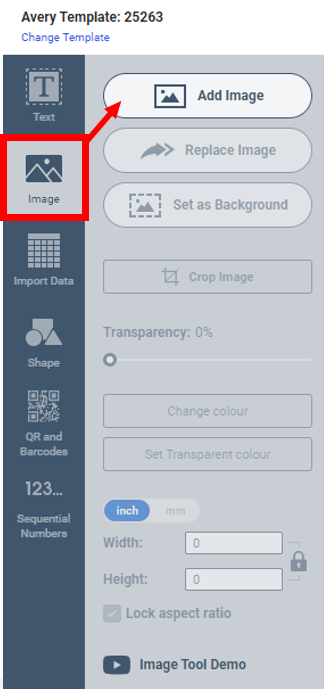
Select Image on the left and click Add Image
-
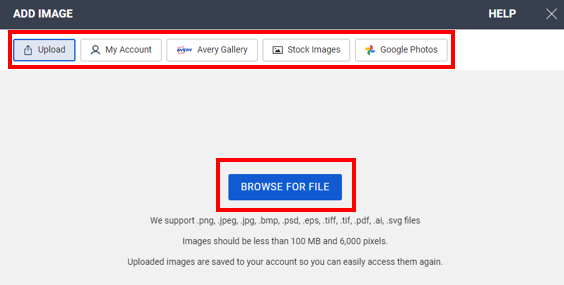
Find the image you want to add (Upload from your Computer, your Avery Account, our Avery Gallery, Stock Images, or Google Photos).
Supported file types: png, jpeg, jpg, bmp, psd, eps, tiff, tif, pdf, and, svg. File size should be less thatn 100mn and 6,000 pixels.
Here is how to add from your Device: Click Upload
then Browse for File to find and Open the image file on your device:
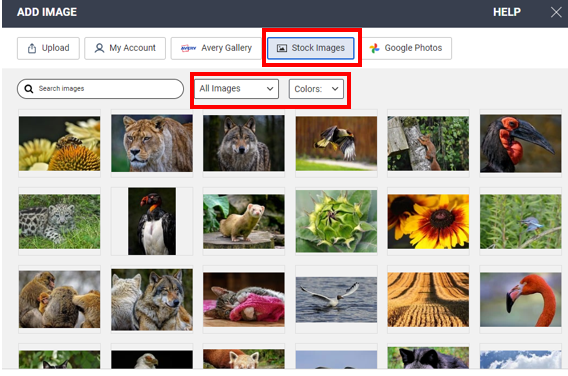
To add a free image from our Pixabay partner, click the Stock Images button and type
in your search term and hit Enter on your keyboard. You can also filter the search with the type of
image under All Images and by Colours:
-
To delete, click to select the image, then click Delete on your keyboard or the delete icon near the top

Move and rotate images
-
To move an image, click the image and hold, then drag the image to the new position
(or use the arrow keys on your keyboard – the Shift key helps make smaller moves)
-
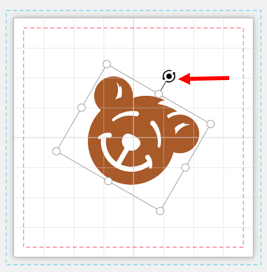
Rotate an image by clicking the blue circular button at its top and dragging left or right
Resize an image
-
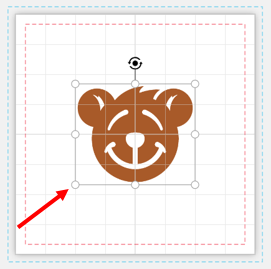
Click the image, then click the white circles along the edge and drag
-
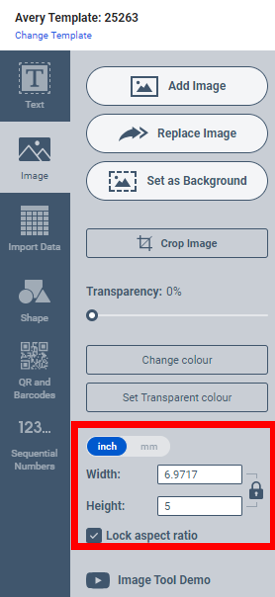
Lock aspect ratio keeps the image from stretching, uncheck to make it taller or wider
Background images
-
Click Set image as background
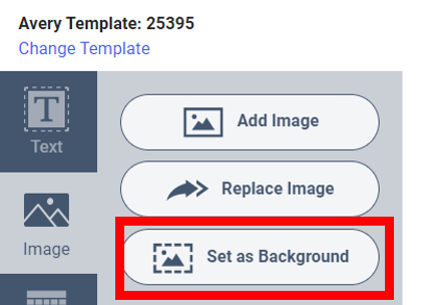
-
Lock aspect ratio keeps the image from stretching, uncheck to make it taller or wider
-
To remove a background image, click Unlock background, then Delete
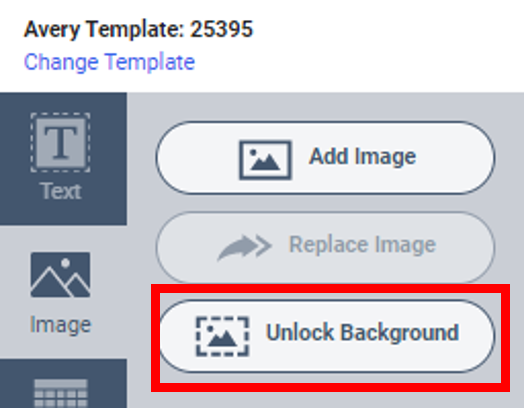
Tip: Use Background near the top to add or remove solid background colours,
and use Shape to add different solid backgrounds to each label or card
Change image colours
-
Click Change Colour, then click a colour or type a Hex Colour
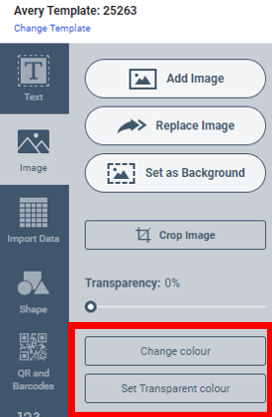
-
Your cursor will turn into a paint bucket, click the colour in the image to replace
-
To replace all the parts of the image that are the same colour, check Replace colour across entire image
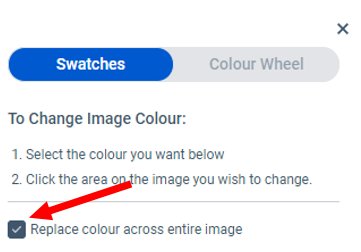
-
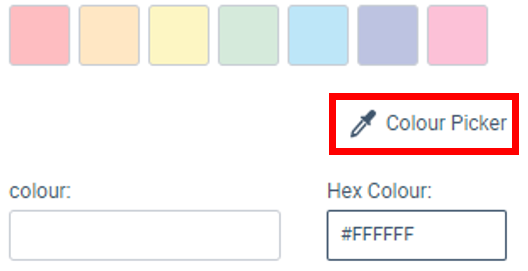
To replace with a colour from your design, click Colour Picker to activate the eyedropper,
click the colour you want use, then click the item to change the colour
Tip: Use Zoom to help click a specific colour
Add transparency to an image
-
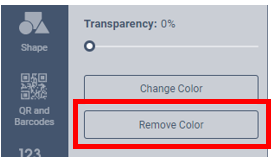
To remove one colour from your image, click the image, then Remove Colour and click the area of the image to make transparent
-
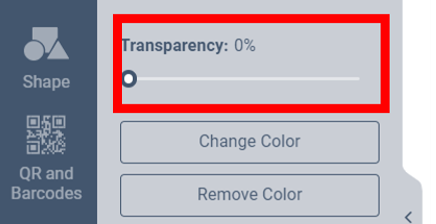
To make an entire image opaque, use the Transparency slider
Crop an image
-
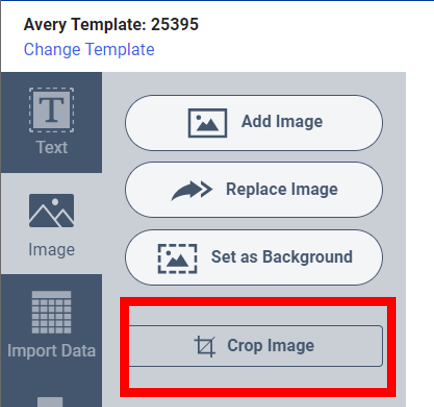
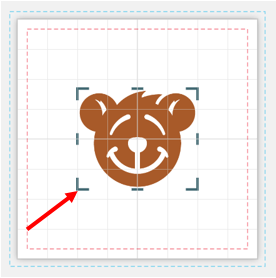
Click the image, then click Crop image and crop marks will appear on the edges
-
Click and drag the crop marks to remove the parts you don’t want
-
Click off the image and it will be cropped
Tip: Use the Undo button to reset the image
Insert and format
-
On the left click Shape and Add Shape
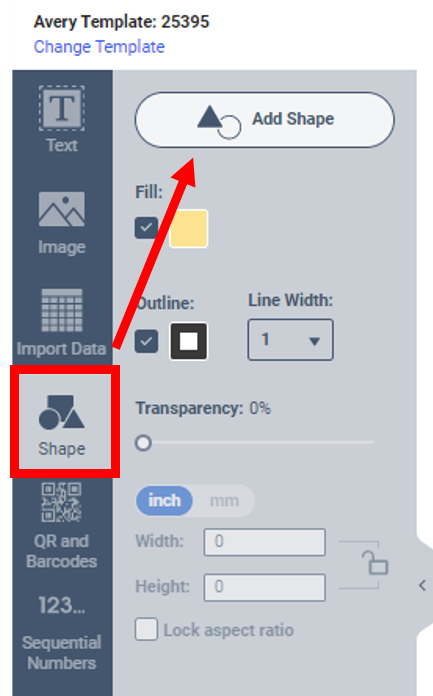
- Choose from Basic, Arrows, Mathematic or More shapes using the dropdown
- Double-click or drag and drop the shape into your design
- Use Fill, Outline, Line Width and the Transparency slider to adjust colours and lines
Resize and move
-
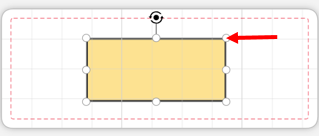
To change the size, click the shape, then click the white circles at the edge and drag
-
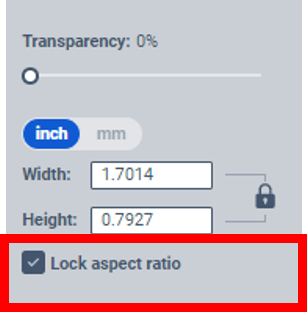
Select Lock aspect ratio if you don’t want the shape to be taller or wider
-
Move the shape by clicking it then dragging
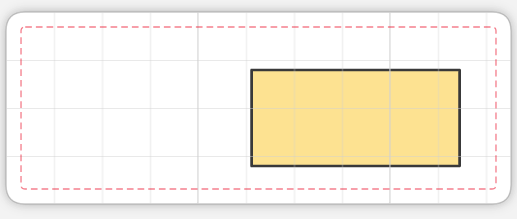
-
Rotate using the blue circular button above the shape
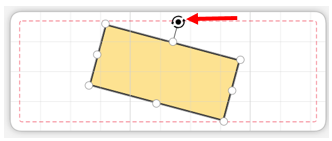
Tip: To add a different background colour to each label or card, insert and format one Shape using Edit All,
move it behind your text and graphics using Layers or Arrange, then switch to Edit One to change the colour on each shape
Insert barcodes by entering manually
-
Select QR and Barcodes on the left, and Add Barcode/QR Code
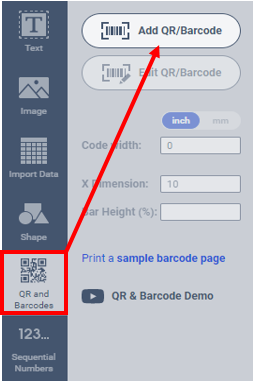
- Choose Enter Manually and click Next
-
Select the type of barcode from the dropdown list, then enter the data
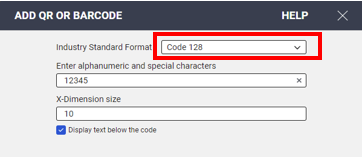
- Make any additional selections for your barcode type and click Finish
Tip: Seek expert advice if you need help choosing the right barcode
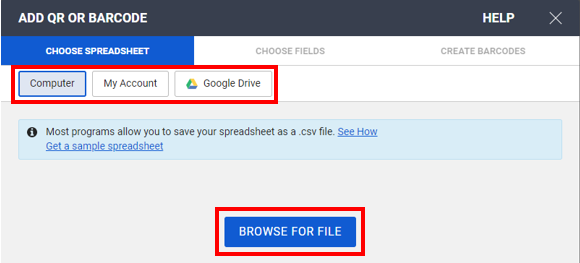
Insert different barcodes from a spreadsheet
-
Select QR and Barcodes on the left, and Add Barcode/QR Code

- Choose Spreadsheet and click Next
-
Browse for file, or click to use a spreadsheet from an Avery account or Google Drive
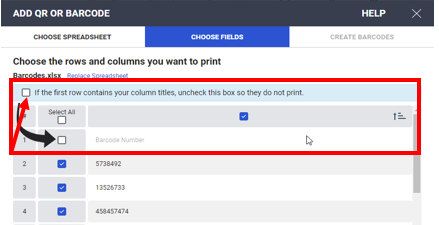
- Uncheck any columns or rows you don’t want to print on Choose Fields
-
If your spreadsheet has a header row, un-check the first row and select Next
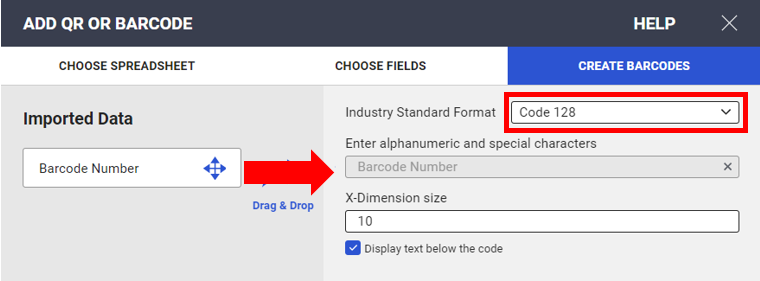
-
Choose the barcode type on the right, drag the fields from the left to the correct place on the right and click Finish
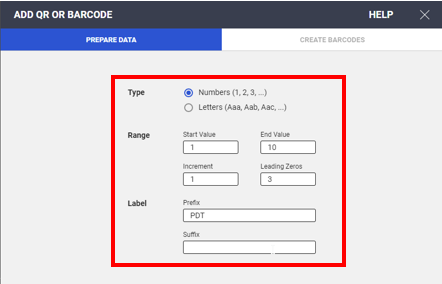
Insert barcodes with sequential numbers
-
Select QR and Barcodes on the left, and Add Barcode/QR Code

- Choose Sequential Numbers and click Next
-
Select Numbers or Letters, then the start and ending values, increments, leading zeros,
and any prefix or suffix you want on the series. Then click Next
-
Choose the barcode type on the right, drag the fields from the left to the correct place on the right and click Finish
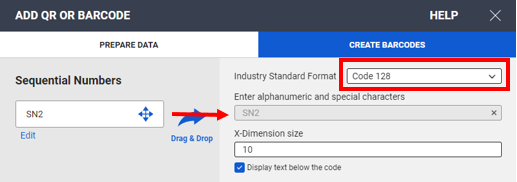
Resize and move barcodes
-
Click the barcode, then click the white circles at the edge and drag to change the size
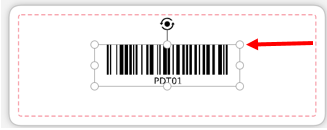
-
Move the barcode by clicking it then dragging
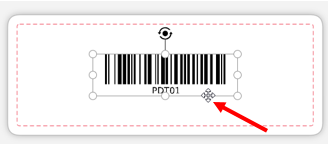
-
Rotate using the blue circular button above the barcode
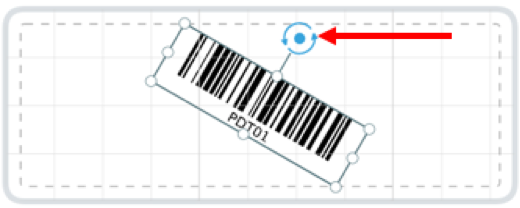
Tip: Test print on plain paper and confirm your barcodes are readable before printing on labels or cards
Insert and format sequential numbers
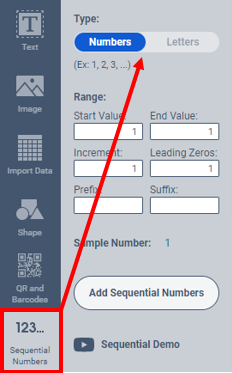
- Select Sequential Numbers on the left
-
Toggle to choose Numbers or Letters
-
Insert the Start Value and End Value and what Increment you want (usually 1)
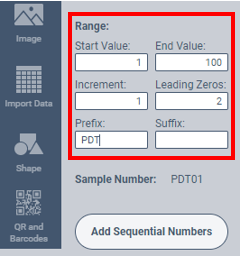
- For the same number of digits on all your items, add Leading Zeros
- Add a Prefix or Suffix to all the numbers or letters, such as the year, if needed
- Click Add Sequential Numbers
Tip: Use the Prefix and Suffix to create legal exhibits with Bates Numbering
Format, resize and move
- Use the Text tools on the left to make changes to font and alignment
-
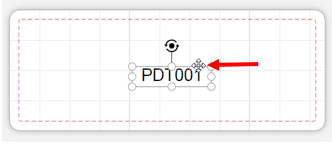
To change the size, click the number or letter, then click the white circles at the edge and drag
-
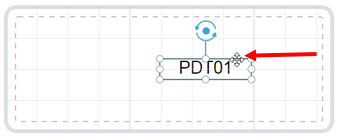
Move by clicking the edge then dragging
-
Rotate using the blue circular button above the number or letter
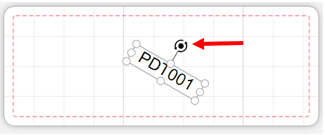
Tip: Copy and Paste sequential numbers from a ticket face to the ticket stub or from front to back of a two-sided product
Prepare and confirm your list
- Be sure your spreadsheet has columns for names, etc. and rows containing what will be on each label or card
- Be sure you don’t have multiple sheets or tabs in the spreadsheet file
-
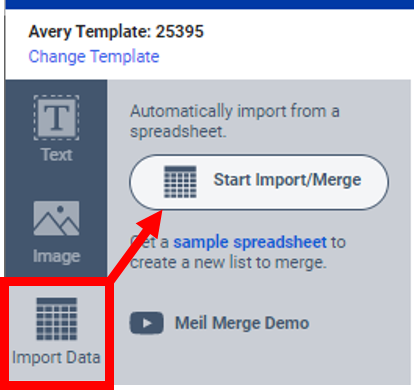
Select Import Data on the left and click Start Import
-
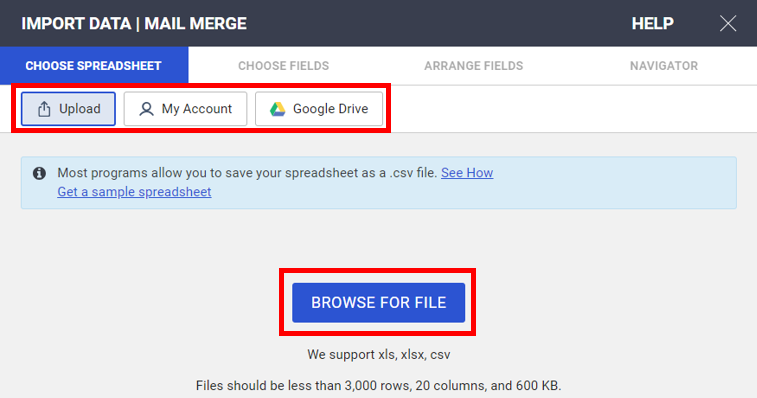
Browse for file, or click to use a spreadsheet from an Avery account or Google Drive
-
On Choose Fields, uncheck any columns or rows you don’t want to print
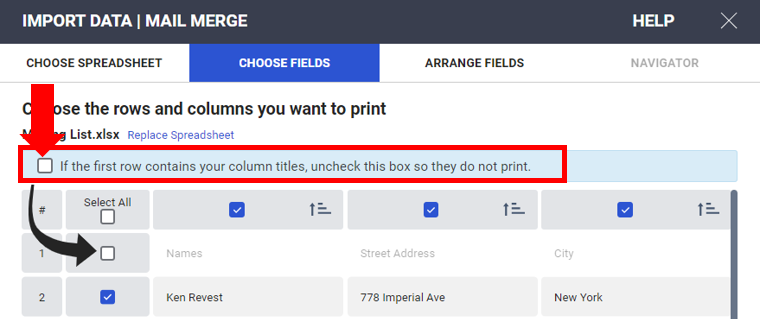
- If your spreadsheet has a header row, un-check the first row so you don’t print it
Tip: Most spreadsheets can be saved or exported as a csv file, which works well
Arrange fields
-
Select each item in Imported Data Fields and double-click or drag it to the Arrange fields area
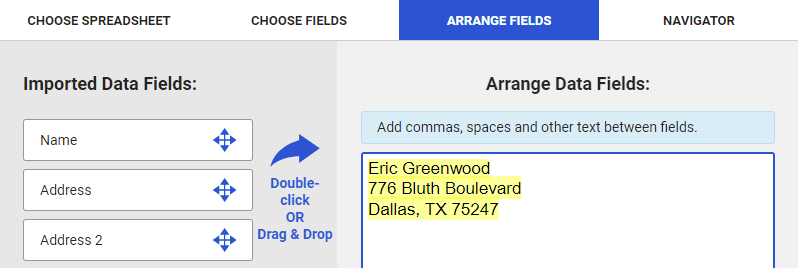
- Use the Enter key to create a new line, then add spaces and commas where needed
Format imported or merged text
- Stay on Edit All until all formatting is done
-
Click Import Data, then Replace Spreadsheet
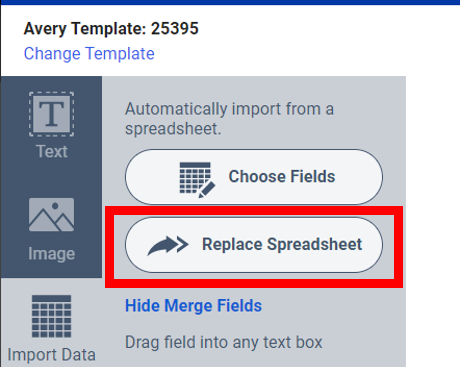
- Browse for the new spreadsheet you want in your project
- Stay on Edit All to move and format the merged text box
Tip: Once you switch to Edit One and make a change to an individual label or card,
that card might be excluded from other changes you make using Edit All
-
The Save button is near the top right of the Customize and Preview & Print screens

- Save to Your Account allows you to open and edit later at avery.com/projects
-
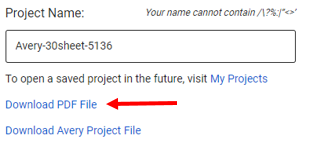
Select Download PDF File if you want to share a PDF, but remember that you won’t be able to edit later without advanced software
-
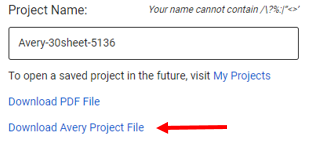
Download Avery Project File saves a .avery file to your computer to open and edit later at avery.com/projects
Tip: Open previously saved projects using Open near the top right
Printing tips
- Click Preview & Print, then Print Yourself and Get PDF to Print
- PDF files are handled differently by each browser so it’s very important to follow the printing tips for your specific browser
- Be sure Paper size is set correctly, the Scale is 100%%, and that you change the Media type to Labels or Heavyweight or Cardstock
- Printers have different settings, so use Help in your printer dialog, or contact your printer manufacturer for specific instructions
Additional print options
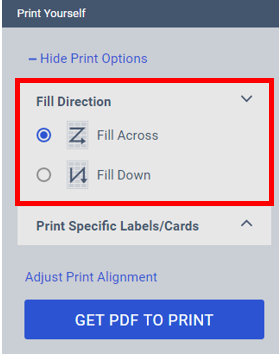
- Expand Print Options on the right in Preview & Print (Step 4) to change the Fill direction to switch from rows to columns
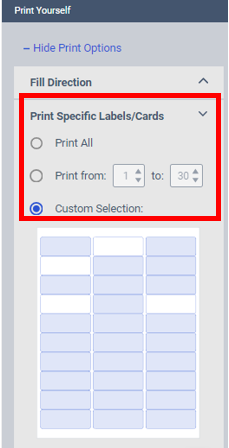
- Use Print Specific Labels/Cards to enter which labels or cards to print or use Custom selection and click the items to not print
Printing two-sided
- Choose a two-sided template in Step 1
- Be sure Print front and back of sheets is selected in Step 4
- Test print on plain paper so you know how to feed and flip your card using the manual feed tray
- After printing successfully on plain paper, print your Avery cards
Tip: For more control, print front of sheet and back of sheet separately
Troubleshooting
- For best results, feed one sheet at a time
- Be sure paper guides are snug and trays are clean
- Some printers perform better using the manual feed tray
- If you are having print issues, download the PDF and open it using Adobe Acrobat Reader
- Printer companies update drivers to improve printing, download the latest version
- Try printing from a different device
Adjust Print Alignment
- If your project is printing consistently too high, low, left or right, use Adjust Print Alignment under Print Options on Preview & Print page in Step 4
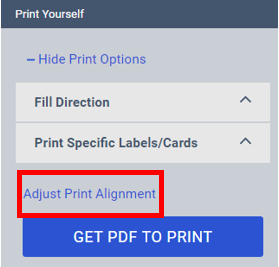
- Measure how far your print is shifting, then use the buttons to select which direction to move your project (Left/Right or Up/Down)
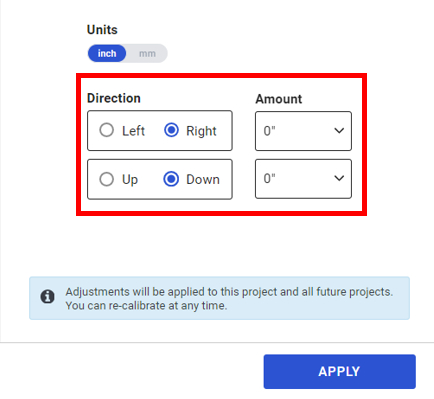
- Use the dropdowns to choose how much to shift and Apply
Divider Creator Wizard
-
To make several sets of dividers, use the Divider Creator to add text and images to fill all the labels at once
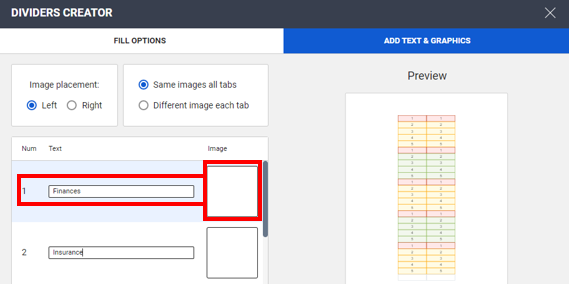
- Format the text after you complete your entries
- If you prefer not to use it, you can close the Divider Creator and enter manually
GHS Wizard
-
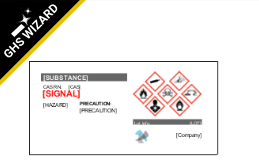
Choose a pre-designed template marked GHS Wizard to launch the wizard
-
Enter the CAS number to auto-fill the required information or type in the substance name
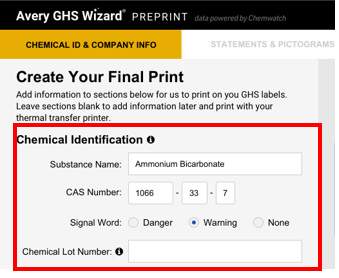
- Enter additional information, such as contact information or lot number
-
Add or remove signal words or pictograms, review carefully and click Finish
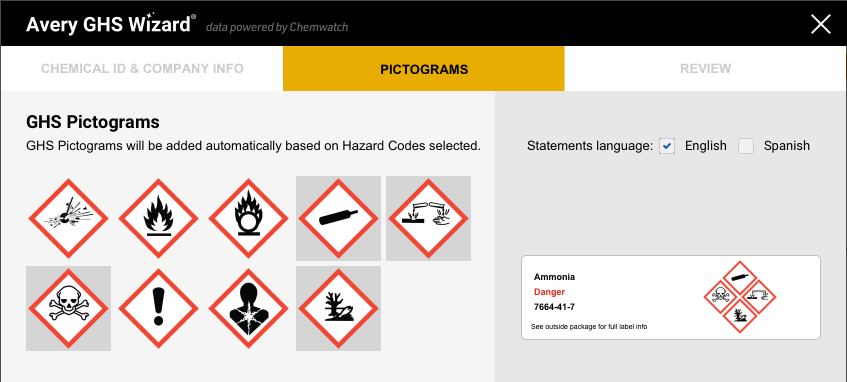
- Edit further and add barcodes or other information if desired
-
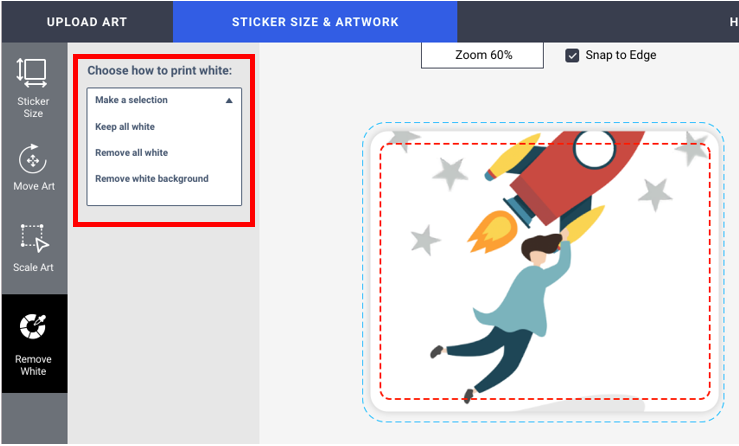
For WePrint custom printing, decide how to print white in your image
- Select Keep all white if you want the white to be printed
- Select Remove all white if you want the label material to show through those areas
- Select Remove white background if you want the label material to show through at the edges of your design
- The White Removal slider increases or decreases removal of similar colours
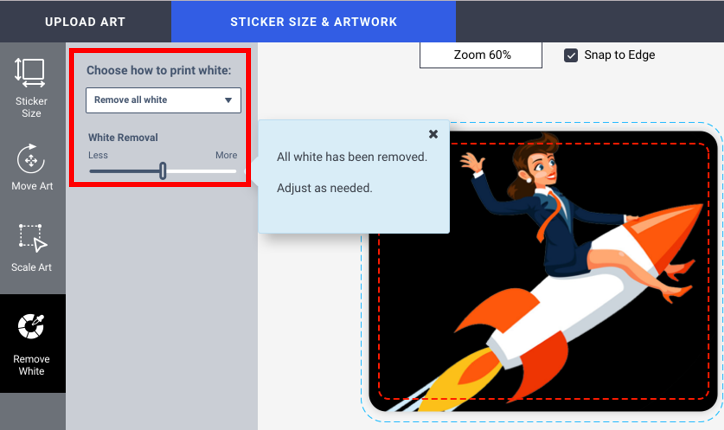
- Dark Mode helps to show which white areas are remaining

Tip: If you’re printing yourself, remember that most printers don’t have white ink, so the label will show through in white areas


